

Find Location from Picture: Default and Software Method
Edited by Caroline Ryan | Feb 25, 2025 | Virtual Location
Many mobile devices and professional cameras have included providing GPS coordinates or locations for every image taken. These features allow easy viewing and tracking of where the images are taken. Thus, it is easy for users to go back to this location to recall memories or simply admire the location. As cameras have a location setting that allows them to embed location data on every photo taken, viewing it can be done in many ways. Through this guide, you will learn two methods to see the location of a photo by default, which include navigating your way through your iPhone, checking or extracting EXIF data on your Mac/PC, using the Map app, and finally, using third-party full-featured software for faking your location when taking photos.

Contents:
Part 1. Where Was This Photo Taken
To effectively recall and pass on the thought ‘where was this picture taken’ to every picture you find in your album. Users should know they can easily locate the location data within the image. Thus, we listed four default methods to find them using only your iPhone, PC/Mac, and Map.
See The Location of the Photo on the iPhone
Pondering, ‘How can I find out where a photo was taken?’ Fret not. If the photo you want to know the location of is taken from your iPhone, you may follow this step, as this method only involves using your iPhone’s Photo app.
Step 1. Open your iPhone’s Photos App, then go to the image you want to see their location information.
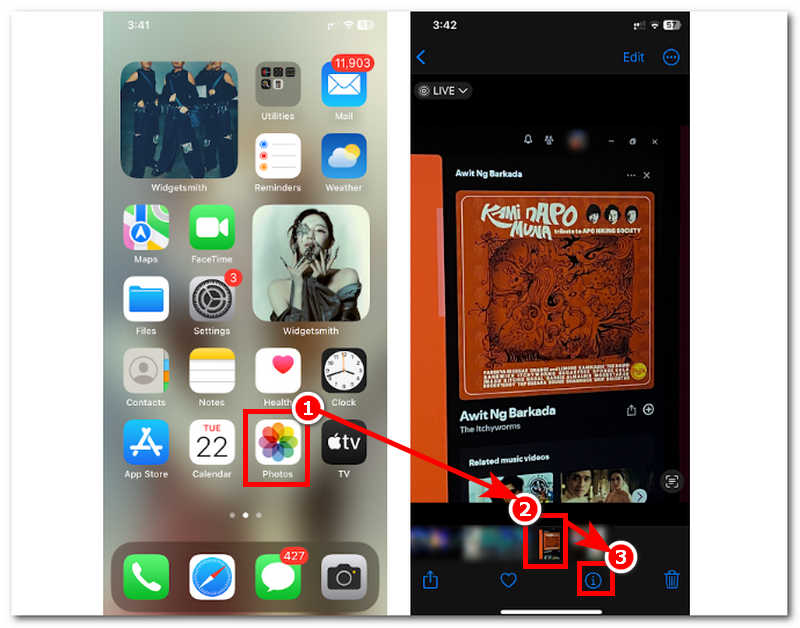
Step 2. There are two ways to view the location information in your selected image. First, look at the topmost part of the image. Usually, this will display where your photo was taken and its date and time.
Step 3. If no location information is available at the topmost part of your image, you can view the location data by tapping the Information icon at the bottom of your screen. Once you tap on it, it will show you the location information with a virtual map so you can visualize where the image was taken.
Extracting JPG Location on PC
How to extract JPG location? For PC users who use their devices to store large files and images for keepsakes, this method might come in handy when they come across a specific image and can no longer recognize where it was taken. Thus, using the PC itself, users can identify locations from photos online.
Step 1. Use your PC browser to look for a location identifier online. Once you have found a web-based tool, simply upload your image.
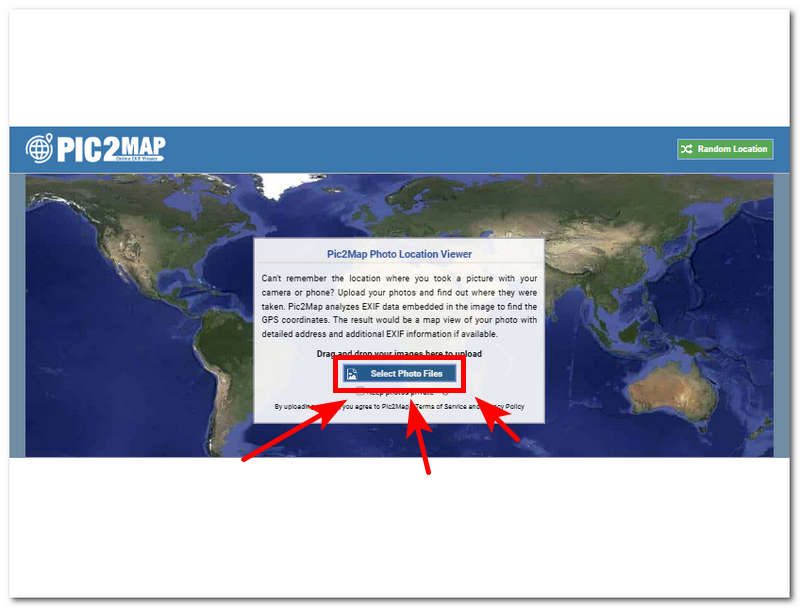
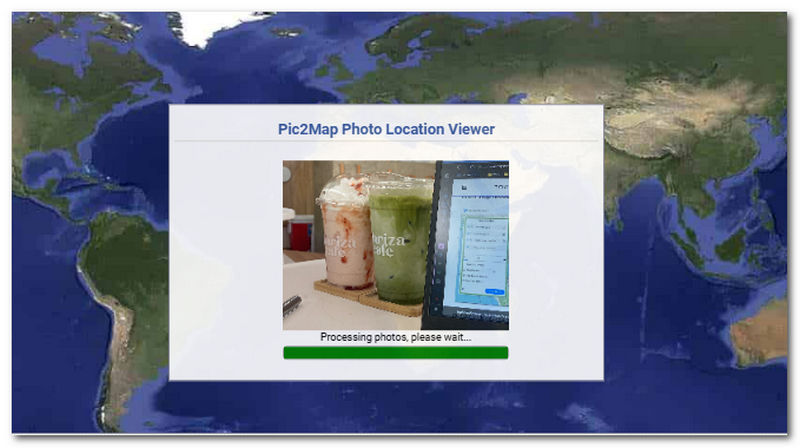
Step 2. Once you upload your image to the tool’s interface, it will automatically initiate the extraction of location information; just wait for it to be finished.
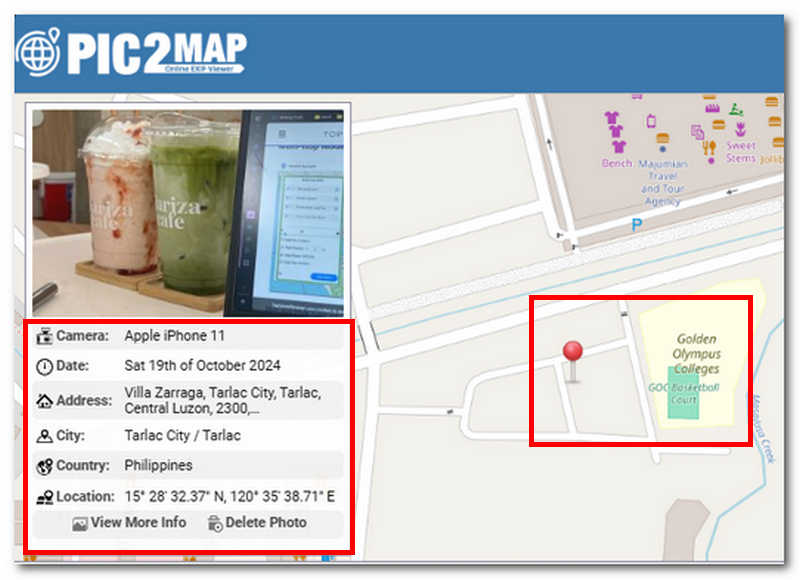
Step 3. Once done, it will display all the information you need about the location, time, and date of the image you took. It will also show you a real-time view of where it is located on the map by pinning it with a red pin.
Check the EXIF Data of the Photo on the Mac
To check the EXIF data using a macOS device, this method only involves using your macOS Finder app to view EXIF file data seamlessly.
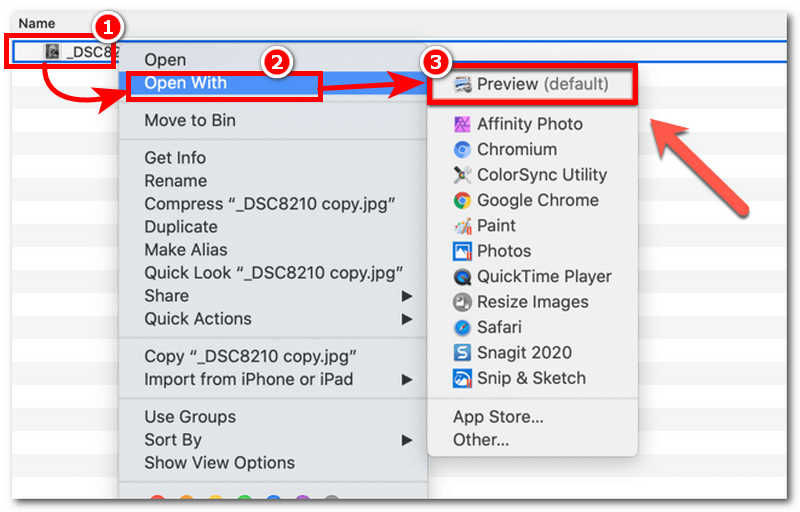
Step 1. In your Mac device, go to the folder where your image is located, right-click on the image file, and click Open With > Preview.
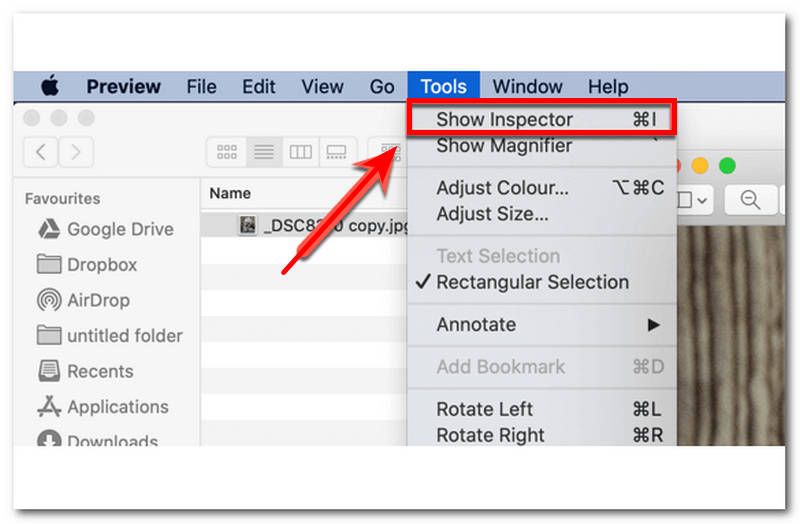
Step 2. Once you click on the Preview button, the Preview window will appear. Within that window, click the Tool > Show Inspector in the upper left corner of the toolbar menu.
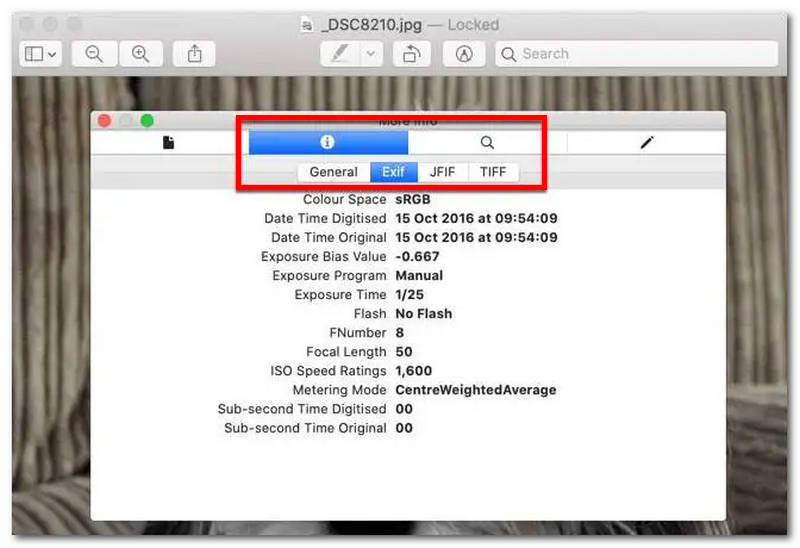
Step 3. Within the Inspector window, click on the Information icon located at the topmost part of the window and click on the EXIF section to reveal the full metadata for your image.
Find Location from Picture on Map
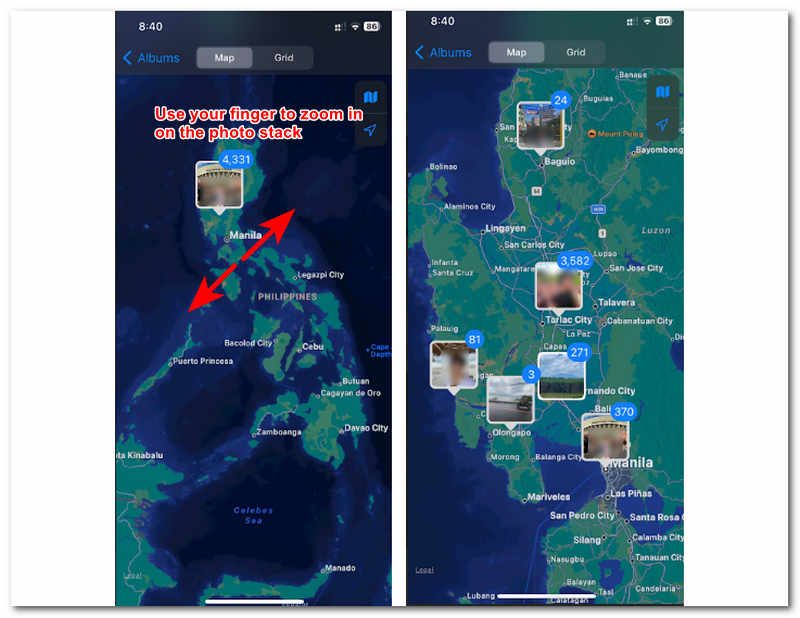
How to see the location of a photo on an iPhone? Using only a default method of your iPhone, you can easily use a map-like feature in your Photos App. To do that, simply follow the steps below.
Step 1. Open your Photos App on your iPhone.
Step 2. Within the Photos app interface, tap on the Albums section in the lower part of your screen. Then, from the Album section, you will see the Places album. Simply tap on it to proceed.
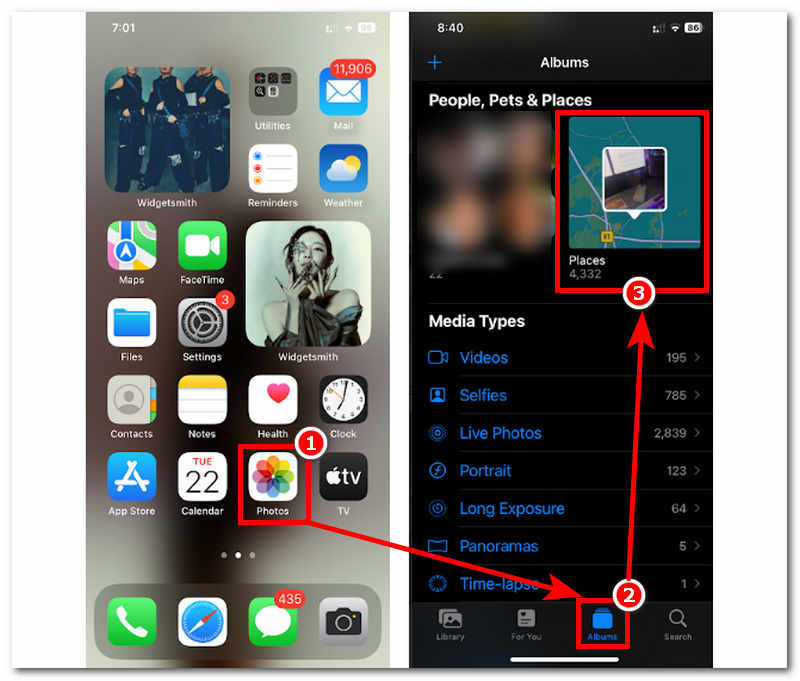
Step 3. From there, a map of your current location will appear, and a stack of photos will be placed in the area where they were taken. Simply use your finger to zoom right in from each photo stack, and that’s how to view the location of a photo on an iPhone.
Part 2. Tips: Use AnyCoord to Fake Location When Taking Photos
We are done with the default method using your iPhone, Mac/PC, and Map. So this method utilizes a full-featured software, AnyCoord, which is free to download on Windows and Mac, making it a versatile location-faking tool that widely supports various apps, games, like Pokemon Go, and platforms like your mobile device’s camera and maps. This software may not work similarly to the default method, as it offers four modes catering to different virtual location tasks. Hence, it still gives users location data information extending to showing real-time coordinates and travel speed for accurate navigation.
To do it effectively, follow our simplified steps below.
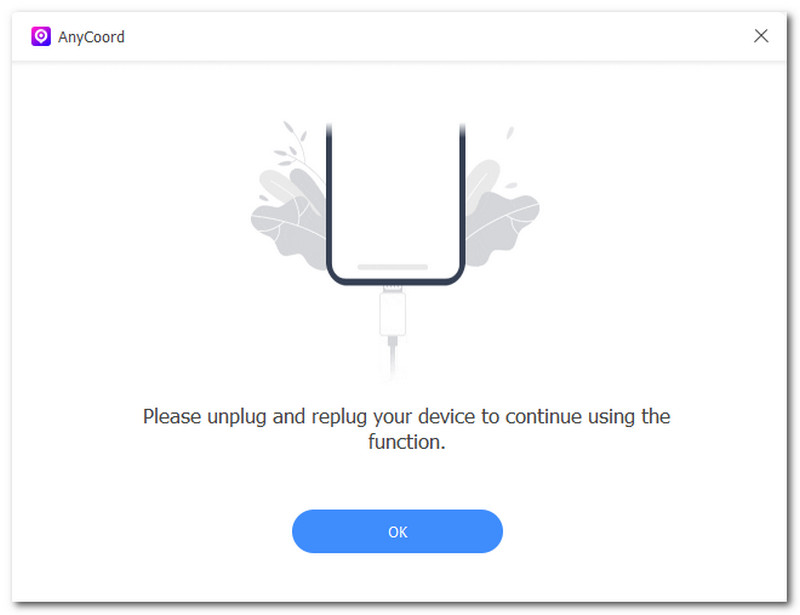
Step 1. Download and install the AnyCoord software tool on your Mac/PC. Once done, open the software and don’t forget to connect your mobile device using a cord to your Mac/PC.
100% Secure & Clean
100% Secure & Clean
Note: Connecting your mobile device to your Mac/PC is necessary as this is the only way to set a virtual location to your mobile device so that when you use your camera to take pictures, you can see the location data in your photo.
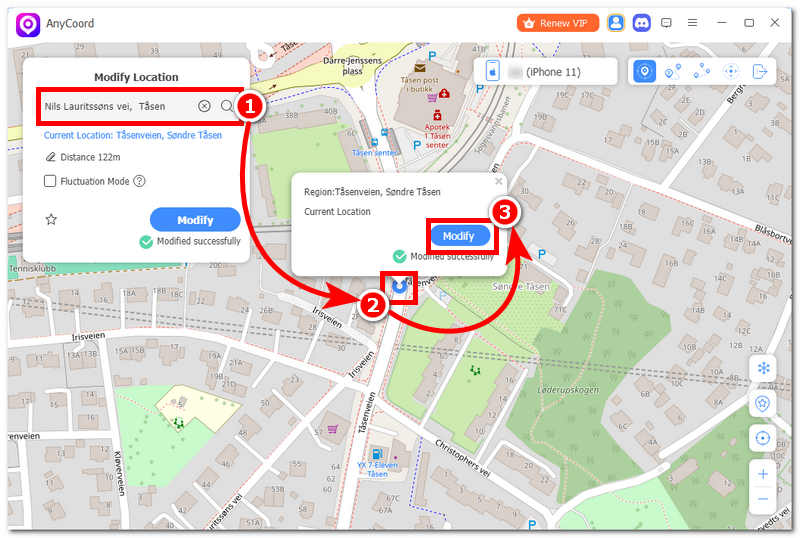
Step 2. In the software's interface, click the Modify Location option to mimic your mobile device camera settings.

Step 3. After that, use the search bar field to locate a virtual place that your mobile device will now use as its current location. To apply the location adjustments on your mobile device after you've chosen an area, just click the Modify button.
Part 3. FAQs about How to See Location of Photo on iPhone
-
1Is location data saved for all photos on iPhone by default?
This is not the case for all cases, as when you use the camera for the first time, it will ask for permission to use location services. Location data is saved for all photos when a user permits the camera.
-
2Can I add or change the location of a photo on my iPhone?
Yes, through the iPhone’s Photos App, you can edit a photo's location data by simply swiping up the image, allowing you to add a new location easily.
-
3What if the location information is missing from the photo?
If the location data is missing from your photo, you probably do not permit your camera to use location services. You can simply enable it by going to your iPhone’s Settings > Privacy & Security > Location Services > allowing your Camera to use location services while using.
Conclusion
To view the location of photos on an iPhone, users need to know where they took the images. Doing so is relatively easy as plenty of methods simplify the process. In this guide, we compiled methods that combine using a default method, third-party software, and even online PC tools. While the default method is more likely the most accessible and ideal way to go, using a this-party software tool like AnyCoord gives more features for setting up a virtual location for you to use in your camera location data.


AnyCoord is the best tool to change, hide, or spoof your location in games, social media apps, and other apps on iPhone or Android devices.
100% Secure & Clean
100% Secure & Clean